
12.9 공부
https://docs.github.com/en/developers/apps/building-oauth-apps/authorizing-oauth-apps
github -> settings > developer settings > OAuth APPS >Register a new OAuth application >

he web application flow to authorize users for your app is:
- Users are redirected to request their GitHub identity
- Users are redirected back to your site by GitHub
- Your app accesses the API with the user's access token
1. Request a user's GitHub identity
GET https://github.com/login/oauth/authorize
When your GitHub App specifies a login parameter, it prompts users with a specific account they can use for signing in and authorizing your app.
login.pug
br
a href="https://github.com/login/oauth/authorize" Continue with GitHun →
이걸로 로그인안됨
Parameters url를 바꿔서 다양한 방법으로 사용자를 승인 할 수있다.
NameTypeDescription
| client_id | string | Required. The client ID you received from GitHub when you registered. |
a href="https://github.com/login/oauth/authorize?client_id= OAtuh만들 때 준 clientID"
| allow_signup | string | Whether or not unauthenticated users will be offered an option to sign up for GitHub during the OAuth flow. The default is true. Use false when a policy prohibits signups. |
github계정 없으면 github 회원가입하게할래? allow_signup
&allow_signup=false로 하면 로그인만되고 새로 어카운드 생성하는거 안됨
| scope | string | A space-delimited 공백으로 구분 list of scopes. If not provided, scope defaults to an empty list for users that have not authorized any scopes for the application. For users who have authorized scopes for the application, the user won't be shown the OAuth authorization page with the list of scopes. Instead, this step of the flow will automatically complete with the set of scopes the user has authorized for the application. For example, if a user has already performed the web flow twice and has authorized one token with user scope and another token with repo scope, a third web flow that does not provide a scope will receive a token with user and repo scope. |
정보를 어디까지 가져올지 우리는 사용자정보를 읽고 이메일 가져 올 것이다.
- Scopes for OAuth Apps
https://docs.github.com/en/developers/apps/building-oauth-apps/scopes-for-oauth-apps
Scopes for OAuth Apps - GitHub Docs
When setting up an OAuth App on GitHub, requested scopes are displayed to the user on the authorization form. If your OAuth App doesn't have access to a browser, such as a CLI tool, then you don't need to specify a scope for users to authenticate to your a
docs.github.com
a(href="https://github.com/login/oauth/authorize?client_id=002423c9c17c374e53f4&scope=user:email"
&scope=read:user user:email 공백으로 구분 // 이메일 읽기전용 , 유저 프로파일정보 읽기전용
그러나 저렇게 긴 url은 실수하기도 쉽고 수정하기 어렵다
그래서
a(href="/users/github/start") Contiune with Github →로 수정하고 라우터를 만든다.
userRouter
import ,
userRouter.get("/github/start", startGithubLoigin)
userController생성
2.export const startGithubLoigin = (req, res) => {
const baseUrl = `https://github.com/login/oauth/authorize`;
const config = {
client_id: "002423c9c17c374e53f4",
allow_signup: false,
scope: "read:user user:email",
}
const params = new URLSearchParams(config).toString();
const finalUrl = `${baseUrl}?${params}`;
return res.redirect(finalUrl);
}
github로그인 누르고 authorlize누르게 되면 github에서 code=""와 함께 설정했던 callback url로 가게된다.
http://localhost:4000/users/github/callback?code=""
http://localhost:4000/users/github/finish로 변경
위 URL을 위한 라우터와 함수만들기
3.github에서 받은 code를 acess token으로 바꿔야한다.
파라미터와 함께 POST request 보내야함
https://docs.github.com/en/developers/apps/building-oauth-apps/authorizing-oauth-apps#2-users-are-redirected-back-to-your-site-by-github
🔽
2. Users are redirected back to your site by GitHub
If the user accepts your request, GitHub redirects back to your site with a temporary code in a code parameter as well as the state you provided in the previous step in a state parameter. The temporary code will expire after 10 minutes. If the states don't match, then a third party created the request, and you should abort the process.
Exchange this code for an access token:
POST https://github.com/login/oauth/access_tokenParameters
NameTypeDescription client_id, client_screct, code가 필요함
| client_id | string | Required. The client ID you received from GitHub for your OAuth App. |
| client_secret | string | Required. The client secret you received from GitHub for your OAuth App. |
| code | string | Required. The code you received as a response to Step 1. |
| redirect_uri | string | The URL in your application where users are sent after authorization. |
client id 가 두번 등장하니 .env에 GH_CLIENT에 저장
.env에 저장한 이유는 비밀이라서가아니고 (어차피 url에 나타남) 한 장소에 넣어서 어디든지 값을 사용 할 수있게 하기위해서
GH_CLIENT=002423c9c17c374e53f4
controller에는
client_id: process.env.GH_CLIENT,
client screct 은 보여지면 안됨!!!
github페이지에서 생성해서 넣기
export const finishGithubLoigin = (req, res) => {
const config = {
client_id: process.env.GH_CLIENT,
clinet_secret: process.env.GH_SECRECT,
code: req.qurey.code
}
console.log(config);
}
이것들을 다시 url로 만들어서 post request를 보낸다.POST는 URL에다가 무엇을 보냄
export const finishGithubLogin = async(req, res) => {
const baseUrl = `https://github.com/login/oauth/authorize`;
const config = {
client_id: process.env.GH_CLIENT,
clinet_secret: process.env.GH_SECRET,
code: req.query.code,
}
const params = new URLSearchParams(config).toString();
const finalUrl= `${baseUrl}?${params}`;
const data = await fetch(finalUrl,{
method: "POST", //finalUrl 에 POST요청 보내고 fetch로 데이터받아온다.
headers:{
Accept: "application/json" //JSON을 return받기위해서는
},
})
const json = await data.json();//그데이터에서 json을 추출
console.log(json)
//fetch가 정의되지 않았다고 오류가남--> fetch는 브라우저에서는 되지만 node.js에서는 사용이안됨
alert처럼
+
HTTP 헤더는 클라이언트와 서버가 요청 또는 응답으로 부가적인 정보를 전송할 수 있도록 해줍니다. HTTP 헤더는 대소문자를 구분하지 않는 이름과 콜론 ':' 다음에 오는 값(줄 바꿈 없이)으로 이루어져있습니다. 값 앞에 붙은 빈 문자열은 무시됩니다.
Authorization :서버와함께 유저 에이전트를 인증하기 위한 자격 증명을 포함합니다.
Accept돌려줄 데이터 타입에 대해 서버에 알립니다. MIME 타입입니다.
우리는 fetch가 필요한데 fetch가 브라우저만있고 node.js에 없어서
npm i node-fetch
import fetch from "node-fetch"; 컨트로러에
export const finishGithubLogin = async(req, res) => {
const baseUrl = `https://github.com/login/oauth/authorize`;
const config = {
client_id: process.env.GH_CLIENT,
clinet_secret: process.env.GH_SECRET,
code: req.query.code,
}
const params = new URLSearchParams(config).toString();
const finalUrl= `${baseUrl}?${params}`;
const data = await fetch(finalUrl,{
method: "POST",
headers:{
Accept: "application/json"
},
})
const json = await data.json();
console.log(json);
res.send(JSON.stirngify(json)); //프론트엔드에서 보게하기위해
-->access token받아온걸 확인 할 수있음
{"access_token":"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","token_type":"bearer","scope":"read:user,user:email"}
지금까지 로그인-->예
코드받아옴
코드-> access_token으로 변환
access_token으로 user 정보 가져오기
4.acess token으로 api 사용해 user정보가져오기
+access token으로 user의 모든 부분을 가져올 수있는 것은 아님
url에 적은 scope 대로 code를 가져온 것
3. Use the access token to access the API
The access token allows you to make requests to the API on a behalf of a user.
Authorization: token OAUTH-TOKEN
GET https://api.github.com/user
For example, in curl you can set the Authorization header like this:
curl -H "Authorization: token OAUTH-TOKEN" https://api.github.com/usercontinue with github눌러서 authorazation 누르면 다시 돌아오고 코드를 받는다.
코드를 access token으로 바꿔서 api에 접근하여 사용자 정보를 가져온다.
const tokenRequest = await(
await fetch(finalUrl, {
method: "POST",
headers: {
'Accept': "application/json",
'Content-Type': "Application/json"
},
})
).json(); // const json = await data.json(); 이걸 없에고 await안에 await 해줌
if("access_token" in tokenRequest){
//access api
const {access_token}= tokenRequest;
const userRequest = await(
await fetch("https://api.github.com/user",{
headers:{
Authorization: `token ${access_token}`,
}
})
).json();
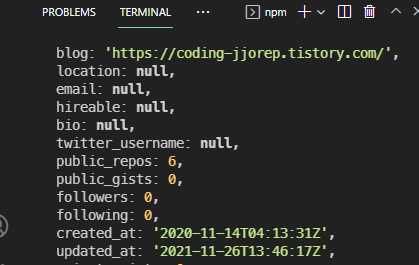
console.log(userRequest);
}else{
return res.redirect("/login");
}
}
https://docs.github.com/en/rest/reference/users#emails
List email addresses for the authenticated user
인증된 사용자의 공개 이메일 주소 나열
Lists all of your email addresses, and specifies which one is visible to the public. This endpoint is accessible with the user:email scope.
GET /user/emails if("access_token" in tokenRequest){
//access api
const {access_token}= tokenRequest;
const apiUrl = "https://api.github.com"
const userData = await(
await fetch(`${apiUrl}/user`,{
headers:{
Authorization: `token ${access_token}`,
}
})
).json();
console.log(userData);
const emailData = await(
await fetch(`${apiUrl}/user/emails`,{
headers:{
Authorization: `token ${access_token}`,
}
})
).json();
console.log(emailData); //여러가지 이메일이나옴 verified , primary된 이메일로 !
}else{
return res.redirect("/login");
}
} public userdata, emailData를 볼 수있는것은 accesstoken 때문이고 이는 url에 기재한 scope 만큼 볼 수있는것
if("access_token" in tokenRequest){
//access api
const {access_token}= tokenRequest;
const apiUrl = "https://api.github.com"
const userData = await(
await fetch(`${apiUrl}/user`,{
headers:{
Authorization: `token ${access_token}`,
}
})
).json();
console.log(userData);
const emailData = await(
await fetch(`${apiUrl}/user/emails`,{
headers:{
Authorization: `token ${access_token}`,
}
})
).json();
console.log(emailData);
}else{
return res.redirect("/login");
}
}
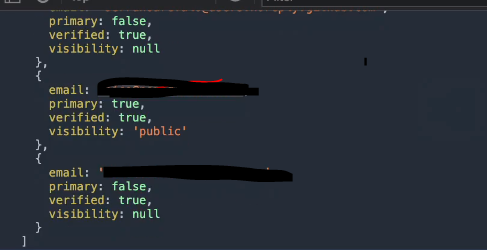
이메일 여러개중 primary true이고 verfied된 이메일 가져올 것임
const emailObj = emailData.find(
(email) => email.primary === true && email.verified ===true
);
if(!emailObj){ //console에 객체 형식으로 이메일이 나옴
return res.redirect("/login");
}
로그인 규칙 만들기
const existingUser = await User.findOne({email: emailObj.email}); //github로그인이든, password로 계정로그인이든 상관없이 해당 이메일이 존재하면
if(existingUser){
req.session.loggedIn = true;
req.session.user = existingUser;
return res.redirect("/");
}else{
//create an account
}
////db에 정보가 있어서 contiune with github 가능
이제 이메일이없을 때 코드
const existingUser = await User.findOne({email: emailObj.email});
if(existingUser){
req.session.loggedIn = true;
req.session.user = existingUser;
return res.redirect("/");
}else{
const user = await User.create({
name:userData.name,
username:userData.login,
email:emailData.email,
password:"",
socialOnly:true,
location:userData.location,
});
req.session.loggedIn = true;
req.session.user = user;
return res.redirect("/");
}
user.js
const userSchema = new mongoose.Schema({
email: { type: String, required: true, unique: true },
socialOnly:{type:Boolean, default:false},
username: { type: String, required: true, unique: true },
password: { type: String, }, requried 옵션 뺌
name: { type: String, required: true },
location: String,
})
///
existingUser user로 바꿈
let user = await User.findOne({email: emailObj.email});
if(!user){
user = await User.create({
name: userData.name ? userData.name : userData.login,
username:userData.login,
email: emailObj.email,
password:"",
socialOnly:true,
location:userData.location,
});
}
req.session.loggedIn = true;
req.session.user = user;
return res.redirect("/");
}else{
return res.redirect("/login");
}
+export const postLogin = async (req, res) => {
const { username, password } = req.body;
const pageTitle = "Login";
const user = await User.findOne({ username , socialOnly :false});
socialOnly false = id, password있어야 함
socialOnly ture = pw 없고 소셜로그인한사람이다.
웹사이트에 이메일이있으면 어디로 가입했던지 상관없이 로그인이 됨
userData,githubData모두 githubAPI에서 가져오고 두개의 reqeust가 있고 서로 다른 ㄷ이터에 접근 할 수잇는 두개의 다른 token이있음
export postLogin = async(req,res)=>{
const user = await User.findOne({username, socialOnly:false});// 아이디비번으로 로그인할 때
}
[ERR_REQUIRE_ESM] Error로 문제를 겪으시는 분들 보세요!
오늘 node-fetch가 Version 3를 내면서
npm install node-fetch를 하면, version 3.0.0이 설치됩니다.
수업에서 사용하는 버전은 2.6.1이구요
Version 3으로 설치되어 실행시키면, 아마 [ERR_REQUIRE_ESM] 가 뜰겁니다.
이것은 node-fetch가 Version 3부터는 ESM-only Module이어서 그런 것 같습니다. 공식문서에서는 CSM(CommonJS)를 쓰는 사람들은 버전 2로 쓸 것을 권장한다고 합니다. 이미 설치하셨으면, npm uninstall node-fetch로 제거하시고
npm install node-fetch@2.6.1 명령어 실행하시면 강의처럼 잘 굴러갑니다.
참고바랍니다. 아마 오늘 이후로 들으시는 분들 강의내용 그대로 따라하시면 모두 겪을 문제같아서 공유합니다.
logout 구현
export const logout = (req, res) => {
req.session.destroy();
return res.redirect("/")
}